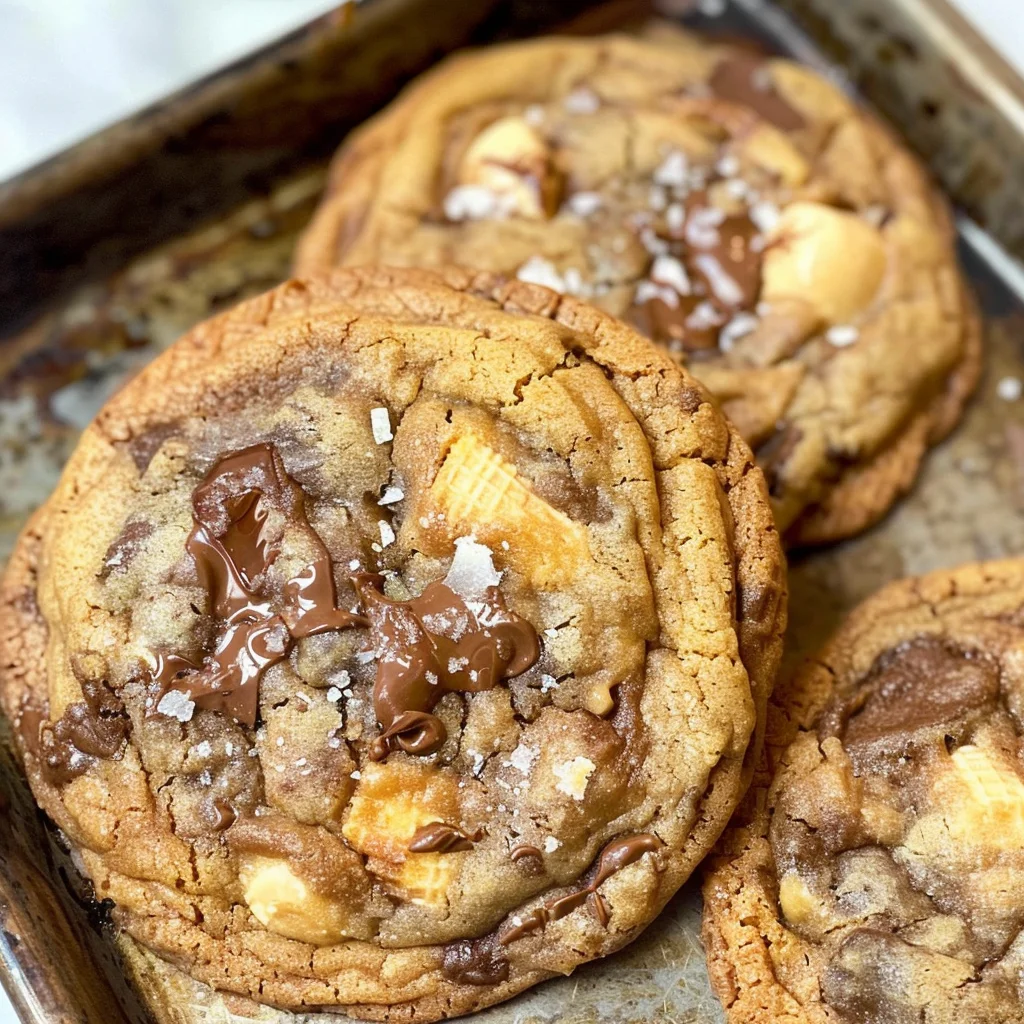
If you’re looking for a fun and delicious twist on classic cookies, you’ve come to the right place! These Ice Cream Cone Cookies are not just a treat; they’re a celebration of everything wonderful about cookies. Imagine chewy, buttery goodness swirled with bits of broken ice cream cones, delectable chocolate chips, and ribbons of hot fudge. It’s like enjoying an ice cream sundae in cookie form!
This recipe is perfect for any occasion—whether you’re hosting a family gathering, baking with the kids, or simply craving something sweet after a long day. Trust me, once you take that first bite, you’ll understand why these cookies are quickly becoming a favorite across households.
Why You’ll Love This Recipe
- Quick and Easy: With just 15 minutes of prep time, you can whip up these delightful cookies in no time!
- Family-Friendly Fun: Kids love helping out in the kitchen, especially when it involves smashing cones and swirling fudge.
- Deliciously Unique Flavor: The combination of crunch from the cones and gooeyness from the fudge creates an irresistible taste.
- Perfect for Sharing: Bake a batch to share with friends or neighbors—these cookies are sure to bring smiles all around!
- Make-Ahead Friendly: You can prepare the dough ahead of time and bake fresh cookies whenever you want!
Ingredients You’ll Need
These Ice Cream Cone Cookies use simple and wholesome ingredients that you probably already have in your pantry. Gather these goodies to get started on your cookie adventure!
For the Cookie Dough
- ½ cup butter
- ¾ cup brown sugar
- ¼ cup granulated sugar
- 1 large egg
- 2 tsp vanilla
- ½ tsp baking powder
- ½ tsp baking soda
- ½ tsp salt
- 1½ cups all-purpose flour
For the Mix-Ins
- ½ cup chocolate chips
- 2 sugar or waffle cones (feel free to mix flavors!)
- 3 tbsp hot fudge (chilled or frozen)
- Flaked salt for topping
Variations
This recipe is wonderfully flexible, allowing you to put your own spin on it! Here are some fun variations to consider:
- Try Different Mix-Ins: Swap out chocolate chips for white chocolate, peanut butter chips, or even dried fruit for a fruity twist!
- Go Nutty: Add chopped nuts like pecans or walnuts for an extra crunch and flavor boost.
- Gluten-Free Option: Substitute with gluten-free flour blends to make this recipe suitable for those avoiding gluten.
- Vegan Alternative: Use plant-based butter and flaxseed meal mixed with water as an egg substitute for a vegan version.
How to Make Ice Cream Cone Cookies
Step 1: Preheat Your Oven
Preheat the oven to 375 F and line two baking sheets with parchment paper. This ensures your cookies bake evenly without sticking!
Step 2: Cream Butter and Sugars
In a stand mixer fitted with a paddle attachment, combine butter and sugars. Beat on medium-high speed until light and fluffy—about 3 to 4 minutes. This step is crucial because it incorporates air into the mix, giving your cookies that lovely chewy texture.
Step 3: Add Egg and Vanilla
Add in the egg and vanilla extract. Mix on low speed until smooth. It’s important not to overmix at this stage so that your cookies remain tender.
Step 4: Combine Dry Ingredients
Slowly add in your dry ingredients—baking powder, baking soda, salt, and flour—carefully mixing until just combined. Overmixing can lead to tough cookies, so stop when you still see some flour remnants.
Step 5: Stir in Chocolate Chips and Cones
Gently fold in chocolate chips along with broken pieces of your sugar or waffle cones. Then, drop generous scoops of hot fudge into the mixture and swirl gently. Be careful not to lose that beautiful marbling effect!
Step 6: Scoop Dough onto Baking Sheets
Using a large scoop (about 4 tablespoons), place cookie balls on your prepared baking sheets—make sure they have space between them as they will spread while baking.
Step 7: Bake & Finish with Flaked Salt
Sprinkle each cookie ball lightly with flaked salt before placing them in the oven. Bake for about 11-14 minutes or until edges begin turning golden brown. Once out of the oven, run a spoon or spatula around each cookie while they’re warm to help shape them into perfect circles! Add more flaked salt if desired for that sweet-salty finish.
These Ice Cream Cone Cookies are bound to be a hit whether you’re enjoying them solo or sharing with loved ones!
Pro Tips for Making Ice Cream Cone Cookies
Creating the perfect Ice Cream Cone Cookies can be a delightful experience, and these tips will help ensure your cookies turn out amazing every time!
-
Use room temperature butter: This helps the butter cream easily with the sugars, resulting in a light and fluffy texture that’s essential for chewy cookies.
-
Don’t overmix the dough: Overmixing can lead to tough cookies. Stop mixing as soon as you see no more flour to keep them tender and delicious.
-
Chill the dough if necessary: If your dough feels too soft, chilling it for 15-20 minutes can make it easier to handle, so your cookies maintain their shape during baking.
-
Experiment with toppings: Feel free to add extra chocolate chips or even sprinkles on top before baking for an added crunch and visually appealing finish.
-
Monitor baking time closely: Ovens vary, so check your cookies a minute or two before the suggested time. They should be golden at the edges but still soft in the center when you take them out.
How to Serve Ice Cream Cone Cookies
Presenting your Ice Cream Cone Cookies in a fun and inviting way can elevate your dessert experience. Here are some creative ideas!
Garnishes
- Drizzle of hot fudge: A warm drizzle on top adds richness and enhances the flavor profile of your cookies.
- Sprinkle of flaked sea salt: Adding a touch of flaked salt on top just before serving provides a delightful contrast to the sweetness.
Side Dishes
- Vanilla ice cream: Pairing these cookies with a scoop of vanilla ice cream creates a delightful dessert combo that’s reminiscent of classic ice cream sundaes.
- Fresh fruit salad: A refreshing fruit salad balances the sweetness of the cookies and adds a pop of color to your plate.
- Whipped coconut cream: This dairy-free option is light and creamy, making it perfect for dipping or spreading on your cookies.

Make Ahead and Storage
These Ice Cream Cone Cookies are perfect for meal prep, allowing you to enjoy a sweet treat whenever you crave something delicious!
Storing Leftovers
- Store any leftover cookies in an airtight container at room temperature for up to 5 days.
- For longer freshness, consider refrigerating them for up to a week.
Freezing
- Allow the cookies to cool completely before freezing.
- Place them in a single layer on a baking sheet and freeze until solid.
- Once frozen, transfer the cookies to a freezer-safe bag or container. They can be stored for up to 3 months.
Reheating
- To reheat, place the cookies on a baking sheet and warm them in a preheated oven at 350°F (175°C) for about 5-7 minutes.
- For a softer cookie, consider microwaving them for about 10-15 seconds.
FAQs
Can I make Ice Cream Cone Cookies gluten-free?
Yes! You can substitute all-purpose flour with a gluten-free flour blend that measures cup-for-cup. This will allow you to enjoy delicious Ice Cream Cone Cookies without gluten.
How can I customize my Ice Cream Cone Cookies?
Feel free to add your favorite mix-ins like nuts, dried fruits, or even different types of chocolate chips. The possibilities are endless with these Ice Cream Cone Cookies!
Can I use regular cones instead of sugar or waffle cones?
Absolutely! While sugar or waffle cones add sweetness and flavor, using regular cones will still give you that delightful crunch in your Ice Cream Cone Cookies.
Final Thoughts
I hope you find joy in making these delightful Ice Cream Cone Cookies! They’re not just tasty; they’re also a fun way to bring a bit of nostalgia into your kitchen. Enjoy sharing them with friends and family or savoring them all by yourself. Happy baking!
Ice Cream Cone Cookies

Indulge in the delightful world of Ice Cream Cone Cookies—a fun and tasty spin on your favorite dessert! These chewy cookies combine buttery goodness with crunchy bits of ice cream cones, melty chocolate chips, and swirls of hot fudge, creating a treat that’s reminiscent of a classic sundae. Perfect for family gatherings, baking days with the kids, or satisfying a sweet tooth after a long day, these cookies are sure to become a household favorite. With an easy-to-follow recipe that allows for creative variations, you can customize each batch to suit your taste. Bake them fresh and enjoy the smiles they bring!
- Prep Time: 15 minutes
- Cook Time: 12 minutes
- Total Time: 27 minutes
- Yield: About 24 cookies 1x
- Category: Dessert
- Method: Baking
- Cuisine: American
Ingredients
- ½ cup butter
- ¾ cup brown sugar
- ¼ cup granulated sugar
- 1 large egg
- 2 tsp vanilla extract
- ½ tsp baking powder
- ½ tsp baking soda
- ½ tsp salt
- 1½ cups all-purpose flour
- ½ cup chocolate chips
- 2 sugar or waffle cones (broken into pieces)
- 3 tbsp hot fudge (chilled or frozen)
- Flaked salt for topping
Instructions
- Preheat your oven to 375°F (190°C) and line two baking sheets with parchment paper.
- In a stand mixer, cream together the butter and sugars on medium-high speed until light and fluffy (about 3–4 minutes).
- Add the egg and vanilla extract; mix on low speed until smooth.
- Gradually add the dry ingredients (baking powder, baking soda, salt, and flour), mixing until just combined.
- Fold in the chocolate chips and broken cone pieces. Swirl in the hot fudge gently.
- Scoop generous portions of dough onto prepared baking sheets, leaving space between each cookie.
- Sprinkle lightly with flaked salt and bake for 11–14 minutes until edges are golden brown.
Nutrition
- Serving Size: 1 cookie
- Calories: 150
- Sugar: 10g
- Sodium: 95mg
- Fat: 7g
- Saturated Fat: 4g
- Unsaturated Fat: 2g
- Trans Fat: 0g
- Carbohydrates: 20g
- Fiber: 1g
- Protein: 2g
- Cholesterol: 15mg



Leave a Comment